How to Organise Multiple Kitchen Appliances Without Cluttering Your Counter
Share
Modern kitchens have more appliances than ever.
A microwave, air fryer, electric kettle, toaster, mixer grinder, juicer, coffee machine and sandwich maker can all make everyday cooking easier. But when several of these appliances start competing for the same limited counter space, even a well-designed kitchen can quickly begin to feel crowded.
This is especially common in Indian homes, where the kitchen counter often needs to handle everything from daily food preparation and storage to appliances and serving essentials.
The solution is not necessarily to hide every appliance inside a cabinet.
Instead, the goal should be to create a clear system: decide which appliances need to remain accessible, group related appliances together and make better use of vertical space.
Here is a practical way to organise multiple kitchen appliances without making your counter feel overloaded.
Why Kitchen Counters Become Cluttered So Quickly
Kitchen clutter usually does not happen because there is no storage at all.
It happens because different items gradually start occupying the same working area.
A typical kitchen counter may need space for:
- A microwave
- Mixer grinder
- Electric kettle
- Toaster
- Air fryer
- Coffee machine
- Water purifier
- Cooking ingredients
- Utensil holders
- Fruit baskets
- Daily-use containers
Individually, none of these items may take up too much room.
Together, however, they can leave very little open surface for chopping vegetables, preparing dough, plating meals or simply placing groceries after coming home.
This is why appliance organisation should begin with one simple principle:
Your kitchen counter should remain a working surface, not become permanent appliance storage.
1. Start by Separating Daily-Use and Occasional-Use Appliances
Not every kitchen appliance needs to remain visible all the time.
Before reorganising anything, divide your appliances into three groups.
Everyday appliances
These might include:
- Microwave
- Electric kettle
- Toaster
- Coffee machine
- Mixer grinder
These appliances should remain relatively easy to access.
Frequently used appliances
These may include:
- Air fryer
- Sandwich maker
- Juicer
- Food processor
Depending on your household, these may be used several times a week but not necessarily every day.
Occasionally used appliances
Examples include:
- Hand blender
- Waffle maker
- Electric chopper
- Specialty baking equipment
- Large food processors
These appliances do not necessarily deserve permanent counter space.
Store occasional-use appliances inside cabinets, pantry shelves or utility storage and bring them out when required.
This simple exercise can immediately reduce visual clutter.
2. Create Dedicated Appliance Zones
One of the easiest ways to make a kitchen feel organised is to stop spreading appliances randomly across the counter.
Instead, create appliance zones.
For example:
Breakfast zone
This can contain:
- Toaster
- Electric kettle
- Coffee machine
- Tea and coffee containers
- Mugs
Cooking appliance zone
This may include:
- Microwave
- Air fryer
- Mixer grinder
Beverage zone
You could keep:
- Kettle
- Coffee machine
- Tea jars
- Sugar container
- Mugs
Grouping appliances according to how they are used makes the kitchen easier to navigate.
It also makes the counter look intentional rather than crowded.
3. Use Vertical Space Instead of Expanding Sideways
This is one of the most effective ways to organise multiple appliances in a small kitchen.
Most people naturally arrange appliances next to each other.
Microwave beside the kettle.
Kettle beside the toaster.
Toaster beside the air fryer.
Eventually the entire counter disappears.
A better approach is to use vertical storage.
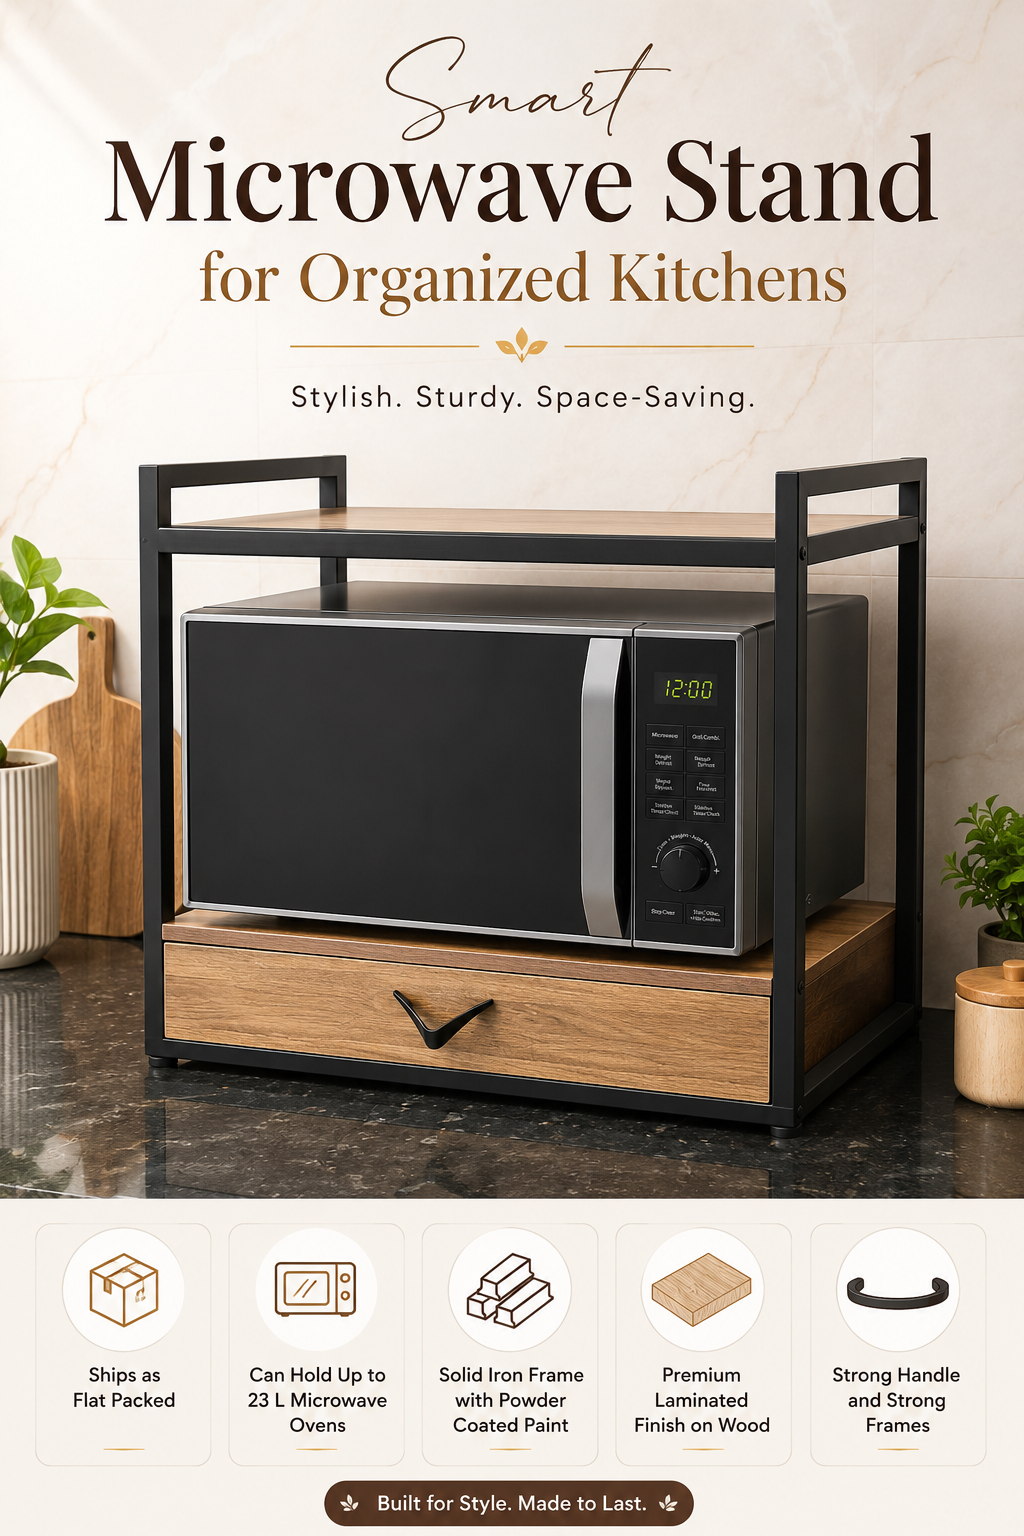
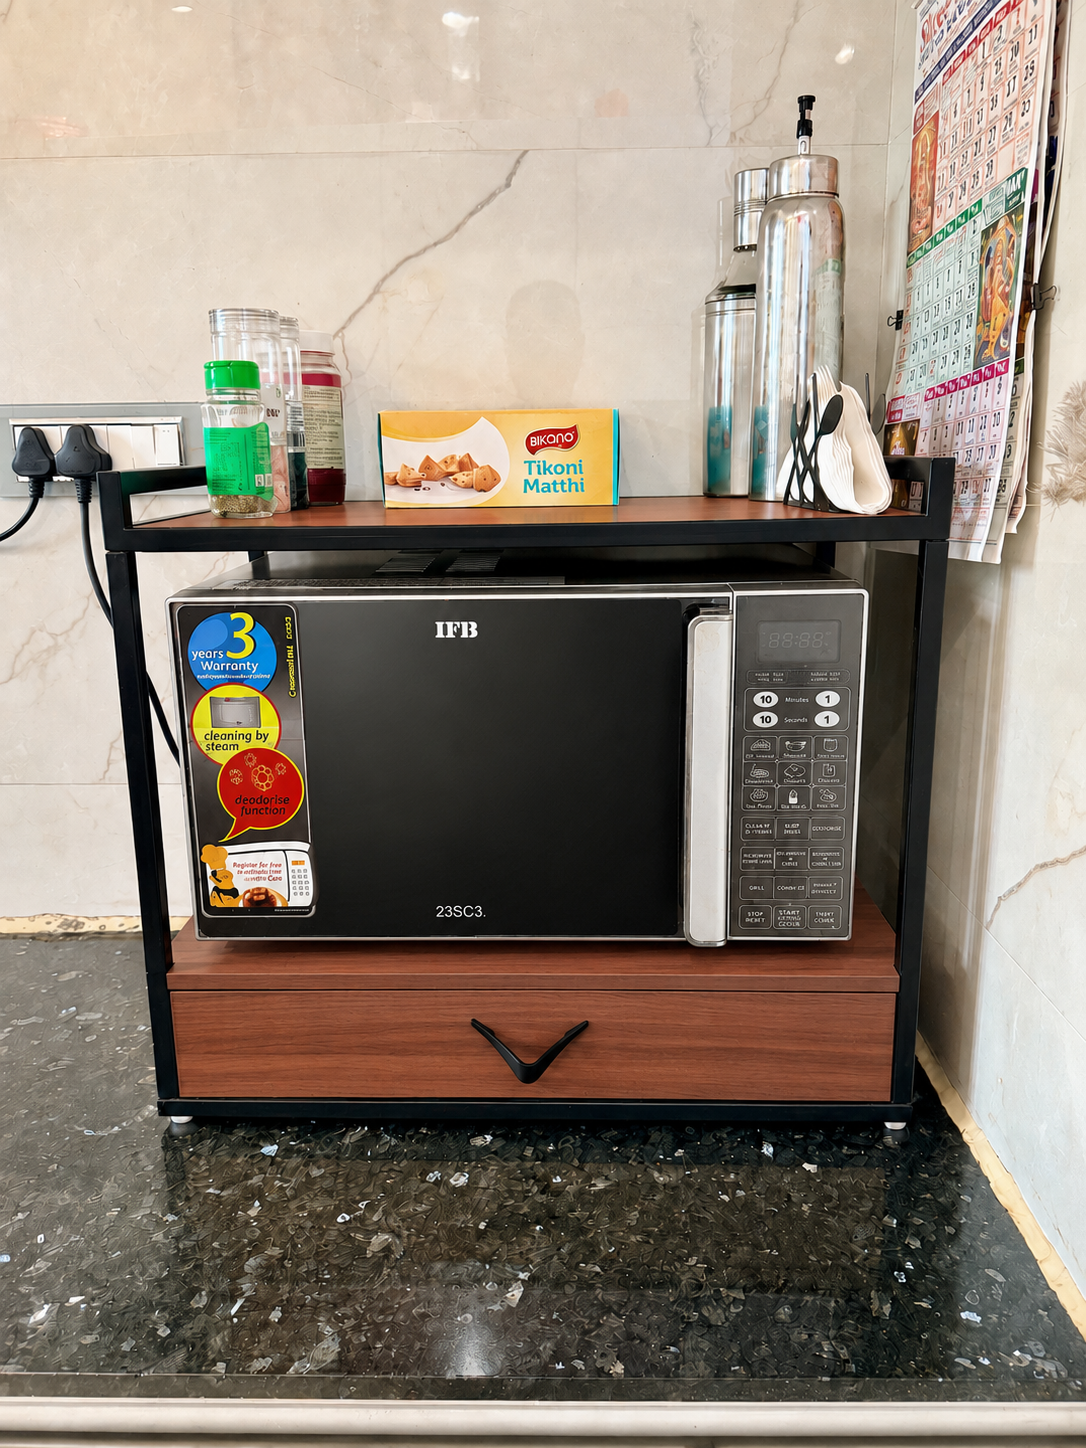
A multi-tier kitchen appliance rack can allow you to use the same floor or counter footprint while creating additional storage above and below.
For example, one setup could include:
- Microwave on the main appliance platform
- Electric kettle and toaster on an upper shelf
- Drawer storage for smaller accessories
- Additional space for tea jars, trays or kitchen containers
Instead of three or four appliances occupying separate sections of your counter, they can be consolidated into one organised zone.
This can be particularly useful in smaller kitchens where every inch of working surface matters.
4. Keep Heavy Appliances at a Comfortable Height
Organisation should not come at the cost of convenience.
Heavy appliances such as microwaves and large air fryers should generally be placed at a height where you can comfortably load, unload and clean them.
Avoid placing frequently used heavy appliances too high.
You should not need to stretch excessively or lift hot food above shoulder level.
A microwave, for example, is usually most convenient when placed somewhere between waist and chest height depending on the user's height and the kitchen setup.
Lighter items such as mugs, containers, kettles and serving accessories can usually occupy upper shelves more comfortably.
5. Do Not Stack Appliances Directly on Top of Each Other
When counter space becomes tight, stacking may look like an easy solution.
For example:
- Toaster on microwave
- Containers on air fryer
- Kettle on another appliance
But this can create several problems.
Appliances often produce heat and require ventilation.
Their top surfaces may also not be designed to support additional equipment.
Instead of stacking appliances directly, use a proper shelf or rack that creates separate levels between them.
This keeps appliances accessible while giving each one its own defined space.
Always follow the ventilation and clearance recommendations provided by the appliance manufacturer.
6. Keep Appliances Close to the Power Points They Need
An organised kitchen should also reduce cable clutter.
Try to create appliance zones near suitable electrical outlets.
Long extension cords running across counters can make an otherwise clean kitchen look untidy and may also interfere with your working area.
Before deciding where an appliance station should go, check:
- Where your electrical sockets are located
- How long each appliance cable is
- Whether the appliance requires a dedicated socket
- Whether multiple high-power appliances may be used simultaneously
Do not overload extension boards or electrical sockets.
High-power appliances such as microwaves, kettles and air fryers should be connected according to the electrical requirements specified by their manufacturers.
7. Give the Microwave Its Own Storage Zone
The microwave is often one of the largest countertop appliances in an Indian kitchen.
Once it occupies the counter, people naturally begin putting items around it.
Containers appear beside it.
A kettle gets placed near it.
Then the toaster arrives.
Soon one large appliance creates an entire area of clutter.
Giving the microwave a dedicated rack can help turn that area into structured storage.
A rack with multiple levels can create space for:
- Microwave
- Small appliances
- Tea and coffee essentials
- Storage containers
- Serving trays
- Kitchen accessories
A drawer can also help keep smaller objects out of sight.
This turns one bulky appliance into the centre of an organised appliance station.
8. Consider an Appliance Station Instead of Separate Storage
An appliance station is simply one dedicated area where several related appliances are kept together.
It does not require renovating your kitchen.
You could create one using:
- A freestanding rack
- Kitchen trolley
- Existing cabinet
- Utility shelf
- Dedicated section of countertop storage
For example, a compact kitchen appliance station might include:
Upper shelf
Electric kettle, toaster and tea containers
Middle level
Microwave
Drawer or lower storage
Napkins, oven mitts, appliance accessories and serving items
This arrangement keeps several kitchen essentials within easy reach while reducing their spread across the main counter.
9. Store Accessories With the Appliance They Belong To
Small accessories often contribute more to clutter than the appliances themselves.
Examples include:
- Air fryer liners
- Mixer grinder jars
- Coffee pods
- Tea strainers
- Measuring spoons
- Toaster accessories
- Microwave-safe covers
- Oven mitts
- Instruction manuals
Instead of storing these items in unrelated drawers, keep them close to the appliance they are used with.
A drawer beneath an appliance station can be extremely useful for this.
For example, the drawer under a microwave can hold:
- Oven mitts
- Microwave covers
- Foil or baking paper
- Small serving accessories
- Instruction manuals
- Cleaning cloths
Keeping related items together makes the kitchen easier to use and reduces unnecessary searching.
10. Keep the Main Preparation Area Appliance-Free
One of the easiest ways to make a kitchen feel larger is to maintain one clear preparation zone.
Try to protect at least one uninterrupted section of counter space for:
- Chopping
- Mixing
- Kneading
- Plating
- Preparing ingredients
Avoid permanently placing appliances in this area.
Even a relatively small clear section can dramatically improve the way the kitchen feels during cooking.
If appliances currently occupy this space, moving them onto vertical shelving or a separate appliance station may immediately improve functionality.
11. Use Trays to Group Smaller Kitchen Essentials
Not every item needs its own shelf.
Sometimes the easiest way to reduce visual clutter is simply to group related items together.
A serving tray can be used to organise:
- Tea jars
- Coffee jars
- Sugar container
- Oil bottles
- Spice containers
- Condiments
- Breakfast essentials
When several small objects are grouped within one defined area, they appear visually organised rather than scattered.
The added advantage is that the entire group can be moved easily when the counter needs to be cleaned.
12. Keep Enough Breathing Space Around Each Appliance
Trying to use every available centimetre can actually make a kitchen look more cluttered.
Leave some empty space.
A well-organised appliance station should not look completely packed.
You should be able to:
- Open appliance doors easily
- Remove accessories
- Clean around the appliance
- Access switches and sockets
- Allow ventilation where required
Empty space is part of good organisation.
Not every shelf needs to be filled.
13. Pay Attention to Appliance Dimensions Before Buying Storage
One common mistake is buying a rack or trolley before measuring the appliances.
Microwaves, air fryers and coffee machines vary significantly in size.
Before choosing storage, measure:
- Appliance width
- Appliance depth
- Appliance height
- Space required for doors to open
- Required ventilation clearance
- Available kitchen area
For microwaves in particular, the external dimensions can vary significantly even between appliances with similar capacities.
A 20-litre microwave and another 20-litre microwave may not necessarily have identical dimensions.
Always measure the actual appliance rather than choosing storage based only on litre capacity.
14. Use Closed Storage for Visually Messy Items
Open shelves work extremely well for appliances and attractive containers.
But not everything needs to remain visible.
Use drawers or closed cabinets for:
- Wires
- Extra attachments
- Instruction manuals
- Packets
- Spare accessories
- Cleaning supplies
- Small tools
This creates a balance between accessibility and visual simplicity.
The appliances you use frequently remain visible while smaller items stay hidden.
15. Reassess Your Appliance Setup Every Few Months
Kitchen habits change.
You may buy an air fryer and stop using your traditional oven frequently.
You may start drinking coffee and use the coffee machine every morning.
Or an appliance that once seemed essential may hardly get used anymore.
Every few months, ask:
Which appliances have I actually used recently?
If an appliance has not been used for several months, consider moving it out of the prime kitchen area.
Counter space should belong to things that genuinely support your daily routine.
Example: A Practical Multi-Appliance Setup
Imagine a kitchen with:
- Microwave
- Electric kettle
- Toaster
- Air fryer
- Mixer grinder
Keeping all five side by side would require a large amount of horizontal counter space.
Instead, you might organise them like this:
Appliance station
Upper shelf: kettle + toaster
Main shelf: microwave
Drawer: oven mitts, tea accessories and appliance accessories
Main kitchen counter
Mixer grinder: near the food preparation zone
Air fryer: in a separate accessible storage area if used several times a week
This setup leaves significantly more open counter space while keeping frequently used appliances easy to reach.
Small Kitchen? Prioritise Function Over Quantity
A small kitchen does not necessarily require fewer appliances.
It simply requires more deliberate organisation.
The mistake is allowing every new appliance to claim another permanent section of counter.
Instead, think vertically.
Group similar activities together.
Keep rarely used appliances stored away.
Maintain one clear working area.
And create dedicated storage for the appliances you genuinely use every day.
A kitchen feels spacious not because it contains fewer things, but because everything has a defined place.
A Microwave Rack Can Become More Than a Microwave Stand
A thoughtfully designed microwave rack can function as a complete kitchen appliance station rather than simply supporting one appliance.
For example, the Sinecraft Creations Powder-Coated Microwave Oven Rack with Drawer and Top Shelf is designed to create multiple storage levels within one compact footprint.
The main platform can accommodate compatible microwaves, while the upper shelf can be used for items such as a kettle, toaster, tea containers or other kitchen essentials.
The drawer provides additional concealed storage for smaller accessories that would otherwise remain scattered across the counter.
This kind of vertical arrangement can be especially useful when you want to organise several everyday kitchen items without permanently sacrificing preparation space.
Before purchasing any appliance rack, always compare the rack dimensions with the actual dimensions and ventilation requirements of your appliances.
Final Thoughts
Kitchen organisation does not have to involve new cabinets, expensive renovation or a completely redesigned kitchen.
Often, the biggest improvement comes from changing how existing space is used.
Start by identifying the appliances you genuinely use.
Move occasional-use appliances away from the main counter.
Create zones around daily routines.
Use vertical shelving wherever possible.
Keep related accessories together.
And most importantly, protect your counter as a working surface.
When multiple appliances have a defined place, even a busy kitchen can feel considerably calmer, cleaner and easier to use.
A well-organised kitchen is not one where everything is hidden. It is one where everything you use has a logical place.